Tuesday, May 29, 2012

Asha's Sawtooth Star Quilt: Part 2 - Piecing the Double Snowball Blocks


Here are my calculations: 


Piece A is a square approximately 6 3/16 in.  This patch is on-point so if you are using a print that has an image or directional pattern on it you will have to decide whether you want the image/pattern to be tilted, or if you want all four sides to be cut on the bias.

Piece B is a square approximately 2 7/8 in. cut in half diagonally. Additionally, I like to trim the acute corners with cuts perpendicular to the hypotenuse such that the hypotenuse is 2 1/2 inches - this makes it easier to line up the patches win piecing.

Piece C is a trapezoid cut to the dimensions described above.  I tried two ways to rotary cut this piece:

  The Hard Way (cut first) - Cut a strip 1 15/16 in. thick and 6 7/8 in. long.  Cut off the corners at 45 degrees, and verify that the top measures 3 1/16 when this is done.  This leaves the short sides of the trapezoid (the sides that will ultimately be the edges of the block) on bias, but I thought it was better to have the long seams on grain.  If you prefer the edge seams to be on grain (or if your printed image/pattern requires it), you can start with a 4 7/8 inch square and cut diagonally into half triangles,  then make a cut parallel to the hypotenuse 1 15/16 inches wide.

  The Easy Way (sew first) - Cut the 1 15/16 in. strip the same length as the Piece A (6 3/16 in.).


Sew four of these patches to the Piece A and press the seams open.  Then rotary cut at 1/4 inch from the corner (making sure to keep the top and bottom points for the square lined up with your ruler).


What Not To Do:


I don't know how I got this far before I realized I was doing it wrong!

 < Part 1       Part 2 >

Thursday, May 17, 2012

Does this make me Mayor Hancock's official photographer?

I know it's a small thing, but this kinda made my day...

The photo I took for this blog post almost 4 years ago can currently be seen on the front page of the City and County of Denver Official Site.

Tuesday, May 15, 2012

Asha's Sawtooth Star Quilt: Part 1 - Design Phase

Evening Star Quilt

I made a quilt for my newest niece, Asha, whose birthday will be any day now (she was due last Friday). I didn't blog my progress as I went in order to keep some of the details a surprise for Asha's parents (although they knew I was making a quilt).

UPDATE:  I just heard that Asha was just born today.  Happy Birthday Asha!

I decided to make a quilt using the Sawtooth Star block (also known as evening star block):

Evening Star Block

Alternated with the Double Snowball block:


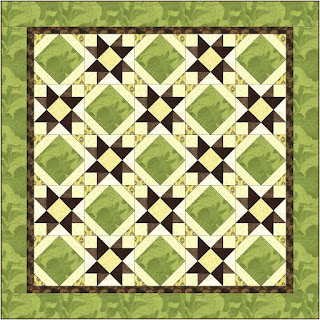
My final design looked like this:

Evening Star Quilt

Earlier versions I considered:


This one has a slightly altered star block:


I also considered making a quilt with the Friendship Star Block:


Once I decided on the design, I needed to get the fabric. I already had the brown fabrics and the cream-colored fabrics that I planned to make the star blocks with, but I wanted to match the green blocks with the shades of green that they were painting the nursery

Jung-Eun (Mom) helpfully provided the names of the paint colors (Tequila Lime, Pear Green, and Celadon Green) and links to the Benjamin Moore website where I could see what they looked like:


In order to translate how the color looked on my screen to how it looked in real life, I opened the images in Gimp and got their RGB values. Then I compared them to the closest equivalent on the color map I got from Spoonflower.

Then I bought greens from the fabric store that most closely matched the color map. This required some judgement calls.

Then I scanned fabrics into the computer.

On my computer screen, the colors of the scanned fabrics and the colors of the paint samples from the website didn't look all that similar, and neither looked much like the way the fabric looked in real life.  But I was happy with the colors and figured it would be close enough.

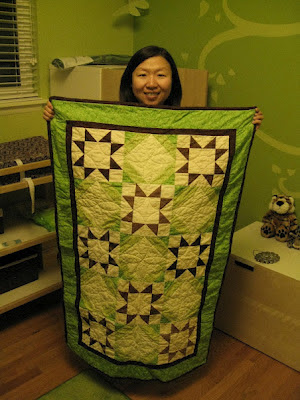
Considering all the color translation uncertainty, I was pleasantly surprised by how relatively well the colors seem to match in this photo they sent me of the quilt in the nursery:


Part 2 >