Monday, December 29, 2014

What I Like About New Year's Eve

Sunset over the Pacific Ocean south of Japan as seen from the ISS

  • It's the only holiday that's truly global. The calendar is arbitrary, sure, and there are some cultures that use different calendars. But this is one thing the entire world has a near consensus on regardless of their religion, ideology, nation of origin or economic status. For one arbitrary day on the calendar, the arbitrary lines we call 'borders' are less significant than the arbitrary lines we call 'time zones'.
  • The significance of this holiday is literally astronomical; We are celebrating a planetary orbit, not the birth of one religion's messiah or one nation's independence.  As such, it is the most inclusive holiday because it isn't just limited to one religion or one nation (or just mothers, or just veterans, etc.), it includes everyone who is stuck in the gravity well of this giant rock, which happens to include every living thing ever known to exist.
  • It's a celebration of history as alive and inexorable. The dates in history books puts all of our victories and failures in a helpful chronological timeline never to be forgotten. On New Year's Eve we get to add one more year to the history books.
  • It's a day to reflect on our mortality and personal development. It's a helpful moment to stop an remember where we were "this time last year" and wonder where we'll be "this time next year".

Friday, October 17, 2014

Penrose Tile Quilt with Mylchreest Stars - Design Phase

I just finished another Penrose tile quilt:


First - Credit where it's due...

If you do a Google Image search on 'Penrose tile quilt' the top three results will be this awesome quilt:


This lovely quilt was made by Serena Mylchreest nearly 20 years ago.  This obviously was an inspiration for my design.

The element of the Mylchreest design that I borrowed is the way the rhombi are divided in half (fat rhombi divided lengthwise, and the thin rhombi split on the narrow diagonal) so it is tiled with triangles instead of rhombi.

Then the critical design element is to select colors of different values for the 'light half' and 'dark half' of the rhombi to create the nifty 3-D effect.

I was pleased with the way my last Penrose tile quilt turned out when I first came up with the notion to machine piece the patches before I English paper pieced the rhombi.  So I played around with some other machine piecable patterns and this was one of the results.

When I designed the layout, I wanted to make a Penrose tiling that was not radially symmetrical through the center like my last quilt (and most Penrose tile quilts). I find their quasi-periodic nature one of the more mind bending elements of Penrose tilings, and I feel this is not obvious when it is radially symmetrical.

I began with this simple layout:

The yellow dots indicate the eventual location of the yellow stars.  The black square roughly indicates the final border of the quilt.

Then I deflate the rhombi 3 levels thusly:


I explain inflation/deflation of Penrose tiles more thoroughly in this post.

After removing the superfluous rhombi, we're left with this base layout:


Then we add these machine piece rhombi:


One last design decision I made was to inflate just five of the rhombi to make the one large star.


Two other designs I came up with while playing with machine-pieced rhombi:


Sunday, August 24, 2014

Friendship Star Cornhole Bags


My niece asked me to make cornhole bags in her wedding colors.  I decided to make them using the friendship star quilt block.  Each block contains nine squares, eight of which consist of half triangles.

Making Eight Half Triangle Squares at Once:


STEP 1:  Stack the two fabrics right sides together.


STEP 2:  Draw corner-to-corner diagonals.


STEP 3:  Stitch a quarter inch to either side of the drawn line.


STEP 4:  Cut along the drawn lines and also vertically and horizontally through the center.


STEP 5:  Press open.


STEP 6:  Trim and square up the patches by lining the corners and trimming them to a perfect square (in this case 2.5 inches).

Assembling the Square Into Blocks:


 STEP 1:  Sew the rows together first. Press the seams of the top and bottom rows toward the middle. Press the seams of the middle row away from the center. This way you create a 'notch' that allows you to align the corners when sewing the rows together.


STEP 2:  Sew the rows together. Press the in rotating directions (I described this 'four patch trick' in detail in this blog post).

Assembling the Bags


STEP 1:  Fuse the block to backing fabric cut on bias.  I used cheap broadcloth that I have spare bolts of.  The color doesn't need to match as long as it doesn't show through.  By cutting the backing fabric on bias, it helps stabilize the block (which is on grain).

NOTE:  You will also need to fuse an additional separate whole cloth block as well to be the back side of the bag.


STEP 2:  Stack the fused friendship star block to the fused whole cloth block (right sides together). Using the triple stitch feature on you machine, sew almost all the way around, leaving approximately 2 inches so you can turn your bag right side out.


STEP 3:  Fill your bag with 14-16 oz. of either feed corn or plastic pellets.  Serious cornhole players will insist on feed corn, but these bags were not for competitive players, so I used plastic pellets because corn will disintegrate with time, may attract rodents, and can't get wet.

TIP:  Thread your needle and sew a few a stitches of the next step before you fill the bag.  It's easier to start when the bag is empty.


STEP 4:  Using heavy duty upholstery thread, hand sew the last 2 inches closed.  Double back and sew back to your starting point for extra security.

Friday, August 1, 2014

Penrose Tile Quilt: Christmas Tree Skirt - Construction Phase


The trick with this design is the combination of machine piecing with paper piecing.  Instead of paper piecing each patch, I machine piece the patches that make up each rhombus and paper piece the rhombi.

Here's how I machine pieced the fat rhombi:


This is a good way to make 40 thin rhombi at one time:


Once all the rhombi have been machine pieced, they are ready to be basted onto the paper and hand assembled.


< Previous Post - Design Phase


Saturday, June 7, 2014

Penrose Tile Quilt: Christmas Tree Skirt - Design Phase

I made this Christmas Tree Skirt as a wedding present for my niece and nephew-in-law:


It's based on a Penrose tiling, which is an aperiodic tiling derived from tiling pentagons. (I'll let wikipedia explain it).

I used a combination of machine piecing and  English paper piecing to construct it using two types of diamonds:

and I lay them out in this base tiling:


Then I do two tricky things that exploit some of the niftier properties of Penrose tilings:  matching rules and inflation/deflation.  These need to be explained in more detail...

Constructing Penrose Tiling using Matching Rules


These rhombi (plural of rhombus, a fancy word for diamond) can be tiled in a lot of ways that are not actually Penrose tilings.  They can be tiled in ways that are periodic, or completely non-periodic:


and you can certainly make some lovely quilts doing this:

This was made by Domesticat

This was made by Dorothea
However, these are not strictly Penrose tilings.  To make a quilt that has that quirky stars-with-ripples effect that the aperiodic tiling creates, you need to follow the matching rules:


My first plan was to design a quilt that copied the curved design as shown in the above diagram (but just the pink lines):


NOTE:  Penrose tiling is beyond the powers of Electric Quilt, so I designed these using Geometer's Sketchpad instead.


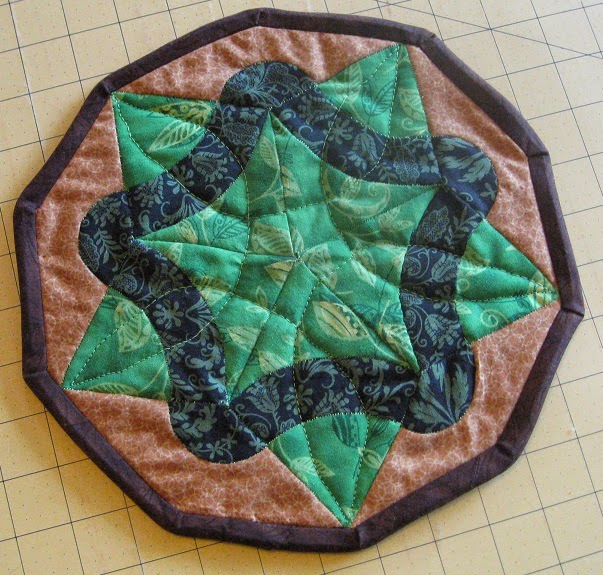
I made this pot holder as a test to see if it was feasible to make the entire full sized quilt this way:


Although this was strictly feasible, I found that all the curved lines and sharp points made this too tricky for my skill level.

So I decided to tweak the matching rules into straight lines:


This way I can machine piece these straight lines first and paper piece the rhombi.


Constructing Penrose Tiling using Inflation/Deflation Properties

One of the mind-bending properties of a Penrose tiling is that if all the rhombi in a given tiling are broken up like so:


The resulting tiling is also a Penrose tiling of smaller tiles.  In this example I deflate this simple tiling one level:


Now I can deflate this tiling down another level (I shaded a couple of rhombi from the previous level to illustrate this):

You can continue this indefinitely.  Here's 3 and 4 level deflation:


The flip side of this is inflation; any tiling can be combined into larger tiles by reversing this process. So any tiling, no matter how large, is only a subset of a single rhombus (mind = blown).

This inspired me to design a quilt that exploits this property.  I first thought it would be interesting to have a quilt that uses different sized rhombi:


Then I thought it would be cool if I designed a quilt where all the rhombi were the same size, but by using different colors and/or values (light and dark), an inflated level of Penrose tiling would emerge:


The combination of this design with the matching rule design above became the final design for the Christmas tree skirt: